Question or issue on macOS:
I want to install xcode to deploy a cross platform flutter application but I cant find enough space for Xcode is there any alternative solutions to just installing it on the internal storage
How to solve this problem?
Solution no. 1:
PLEASE READ THIS FIRST!
I see from the recent comments that some of you are experiencing problems with this solution using the latest versions of Xcode, running on macOS Catalina.
Until further notice, this answer is only valid for: Xcode versions <= 11.3
I will keep adding info towards the bottom of the answer if / when I figure things out! 🙏
Installing Xcode and friends to an external drive
As mentioned in the comments, if you already have Xcode installed the process is quite simple.
Start by copying Xcode from the Internal HD to an External drive, rename the original and run the commands from step 4 & 5, and this should do the trick. If so, delete the original (now renamed) directory / app bundle.
My experience is that if you don’t have Xcode already, the process is a bit more involved.
There may be simpler ways to do this, but after getting different errors for every thing I’ve tried, I’ve done it this way on a MacBook Pro 16″ running
macOS Catalina (10.15.2) and Xcode 11.3:
I have my external drive attached to the MacBook at all times, using a bit of Velcro as the Samsung T5 drive I use is so small and light.
It’s mounted at:
/Volumes/SSD
On the external drive I’ve copied Xcode into:
/Volumes/SSD/Applications
Follow this procedure for installing Xcode:
-
Download the latest 11.3 Xcode release (not the Beta) from Apple’s Developer Site (This is a 7.3GB Download and you need to register for a free developer account by the way)
-
Install the Xcode command-line tools (to the internal drive), which can be triggered by running the following command in a terminal:
sudo xcode-select --install
This will trigger the installation of the command-line tools and establish the/Library/Developer/CommandLineTools
path and set this as the default developer tools path after installation. -
Now, the Xcode download comes as a .xip file that needs to be expanded / unpacked using the
Archive Utility included with macOS.
I’ve already created a directory on the SSD:
/Volumes/SSD/Applications
and moved the Xcode_11_3.xip file here before extracting it by double- clicking it in the Finder.
NOTE:
It will unpack to the same folder as the .xip file, into Xcode.app but leaves the 7.3GB .xip file there as well.
After unpacking, you may move the .xip file somewhere for backup or just delete it. -
Now change the default developer tools directory with command:
sudo xcode-select -s /Volumes/SSD/Applications/Xcode.app/Contents/Developer
then do anotherzsh -lor restart the Terminal.app. -
After setting the Xcode.app as the default developer tools directory, run this command, to have Xcode figure itself out:
/usr/bin/xcrun --find xcodebuildThis took a little while, then I got back:
/Volumes/SSD/Applications/Xcode.app/Contents/Developer/usr/bin/xcodebuild
Moving The Simulators / Emulators
The simulators, caches and all that also takes up a considerable amount of space but lives elsewhere.
For Xcode, the simulators are normally located within:
~/Library/Developer/CoreSimulator
You’ll want to move this whole directory structure to your external drive if you’re looking to maximize the available space on the local drive.
You can use a regular move operation via Finder.app by first doing a regular ⌘ + C (cmd+c) to copy ~/Library/Developer/CoreSimulator then in the target location, You can use ⌥ + ⌘ + V (opt+cmd+v) to move the copied contents directly (might require admin password).
I use /Volumes/SSD/Library/Developer/
Just had to mention this as many don’t know how to properly “cut and paste” files in the Finder, ending up copying first then going back to delete… 🙂
Now make a symlink using:
ln -s /Volumes/SSD/Library/Developer/CoreSimulator /Users/<your_user>/Library/Developer
You should now be able to use and update the simulators as usual.
First time run may throw an error, but subsequent runs should be fine. Sometimes a reboot might be a good thing as well…
The Android emulators are by default located somewhere beneath
~/.android/
Use the same procedure as for the Xcode simulators to move the whole ~/.android directory to a place on your external drive and symlink as described, so you end up with something like:
.android -> /Volumes/SSD/Library/android
when you do a $ ls -la ~ in your Terminal.
Note For Homebrew Users
If you’re using Homebrew for installing packages (like many does), it seems as if Homebrew won’t register that you have the CommandLineTools installed if you move the
/Library/Developer/CommandLineTools
directory, and will try to compile some bottles from source.
Homebrew apparently needs some tools found in the separate Command Line Tools package installed with sudo xcode-select --install that’s missing from the regular Xcode install (I noticed this when upgrading to a new version of Python, it was still being compiled from source no matter what I tried.)
So, if you use Homebrew, you’re probably better off keeping the Command Line Tools installed at the default location.
Just install as described with the sudo xcode-select --install command and leave it there, it’s not taking up much space anyway.
Also, remember to accept the xcodebuild licenses before using a tool that depends on it, using a command like this (with your own path):
sudo /Volumes/SSD/Applications/Xcode.app/Contents/Developer/usr/bin/xcodebuild -license accept
As I said, there might be simpler solutions out there, but
after doing it this way I’ve been able to use Homebrew without errors and Xcode + tools with MacOS, iOS and Flutter frameworks.
Also, I’ve created an alias to the Xcode.app in /Applications to have it conveniently placed together with the other apps. (Cmd + Opt drag the Xcode.app to /Applications in Finder).
Saved myself a ton of space on the internal drive this way.
In response to questions in the comments:
Can I upgrade Xcode / Simulators after using this method?
As long as you create a good old “alias” from the external drive’s Xcode.app to /Applications/Xcode.app by dragging the app while holding ⌥ + ⌘, I’ve not had any problems updating, BUT I upgrade by downloading from the Apple Developer Site, not through macOS AppStore, as I’ve noticed that the AppStore doesn’t accept the alias and thinks that Xcode isn’t installed.
Updates regarding Xcode Versions > 11.3
As I mentioned in the top of the answer, I can’t vouch for this answer if you’re using an Xcode version higher than 11.3.
I’ve gone through all the steps using a fresh install on a new machine.
I experienced a couple of showstoppers while trying to figure this one out, and I only had limited time to spare for doing this.
The problems were a bit more involved than expected.
TODO:
✅ Disk arrived today (Tue, Sep 8)
✅ Install macOS, Xcode, Android SDK and Flutter SDK dev files
✅ Move Flutter SDK, Android SDK and Android emulator to external SSD
✅ Move iOS Simulator files to external SSD
[🛑] FAILED: Move Xcode and Platform files to external SSD
✅ Adapt Zsh environment variables / scripts to reflect the changes
It appears that those who have SIP enabled (probably most users) will get in trouble when accessing tools from within the Xcode app bundle if it’s moved outside the internal drive.
I’m unsure if this behaves the same on machines without the T2 security chip, input on this is appreciated.
You may think that, “hey, I have my tools in /usr/bin or somewhere else, but the problem is that these files are merely shim binaries, which use a system library to resolve a path to a Developer directory, where all the actual executables, libraries and support files are installed.
This complicates matters further as you now no longer know exactly which of these files are in actual use. Just try doing:
$ otool -L /usr/bin/xcrun
# or
$ otool -L /usr/bin/xcode-select
And see what pours out… Same goes for most of the tools.
If you disassemble /usr/lib/libxcselect.dylib (is that allowed? 👀) there’s apparently some additional checks being performed when running Xcode after version 11.3.
I went back and checked and the configuration have had these tests available for a few versions, but they haven’t been activated in previous consumer builds.
So when a directory switch is attempted as described in my original answer, the libxcselect tool will now perform at least one (in)sanity check to ensure that Xcode and its tools are run from internal (safe) storage, which has an immutable system configuration guarded by SIP.
System Integrity Protection, so, you can’t just move or delete it.
My guess is that you’ll have to disable SIP to be able to make this work, and that is not an acceptable solution, as it opens up for lots of security and stability issues (even worse performance).
Finding a Middle Ground
Problem: How to free up space on an internal drive, by moving developer files to an external drive.
I’ve tried pretty much everything I can think of regarding the moving Xcode part, but I’ve met new roadblocks and showstoppers no matter what.
SO. I had to throw in the towel on this one, finding a compromise.
I can live with having saved approximately 50GB of space on my MacBook Pro’s internal 256GB NVMe drive.
I had no trouble moving:
~/Library/Android/* (The whole Android SDK directory)
~/.android/* (Caches and .avd emulator image files)
Using nothing but symbolic links, after copying the contents and deleting the originals.
This is only interesting for those who develop using the Android SDK and tools, so sadly I wasn’t able to solve this madness caused by Apple’s restrictive new policy regarding executable files in “foreign, hostile” locations.
These two directories alone saved me a fair share of space, so I guess for the time being that’s about it.
I’ve tried moving some parts of the Xcode bundle out of the app bundle with varying degree of success, but as you can see in this screenshot:
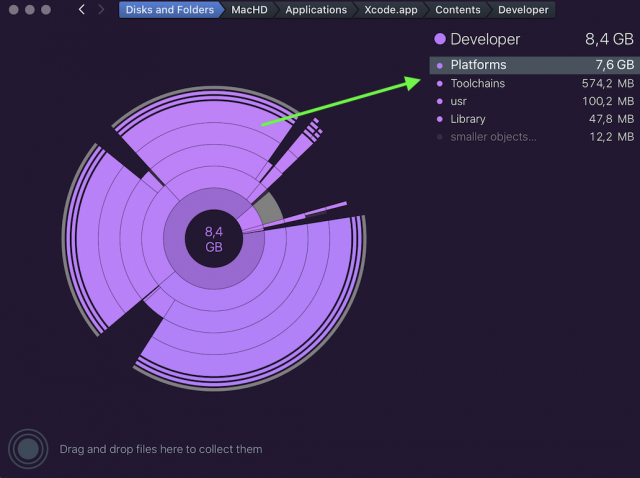
The bulk of the Xcode.app is within the “Platforms” directory, and when I start messing with those files, the build tools blows up on me, but sometimes not, so I really don’t know.
The Simulator files themselves are possible to move, and this will save you anything between a few gigabytes to plenty of GBs depending on how many platforms (iOS / iPadOS etc.) versions you use.
These are located inside:
~/Library/Developer/CoreSimulator
I’ve been able to move this whole CoreSimulator directory without too much trouble using symlinks as explained in the original answer.
I will continue trying to figure this one out, but right now, this is where it’s at.
Solution no. 2:
@cseder you’re a life saver!
Btw, If you are getting issues or takes a long long time in Mac Catalina to verify while doing step 5 /usr/bin/xcrun --find xcodebuild just:
- Turn off the computer
- Turn on, and quick enter in Secure mode (Press CMD + R multiple times)
- Login to your account and open the terminal once Secure mode is on
- Run this command
csrutil disable<- will disable the verification of software download from the internet - Run
sudo reboot
And then you can open Xcode directly without doing any /usr/bin/xcrun --find xcodebuild
Note after you are able to run Xcode then make sure to Turn Off again and enable csrutil enable in secure mode.
Solution no. 3:
As an alternative to just moving XCode to an external drive you could also clone your mac disc and move the whole operating system onto your external drive and make it bootable.
Things you need:
- A large, fast external SSD, such as the Samsung X5 Thunderbolt 3 drive.
- A Mac disk cloner (e.g. Carbon Copy Cloner beta for Big Sur, or SuperDuper!)
Install the cloning software, follow the instructions and you’ll have a bootable external drive in less than an hour (depending on what you are cloning)
You now have a portable development disk which can be plugged in and booted from any modern mac (caveat, not actually tried this)
On first boot and usage of XCode, the Apple OS will perform some verification of apps, but once that is done you should be fine.
I have a 2018 mac-mini running Big Sur with only 128GB internal SSD. Every time I needed to upgrade XCode I had to delete all the simulators. Upgrading to Big Sur was even harder :-/
Performance?
The external drive (Samsung T5) is 3x quicker to write to than the cheap internal SSD that Apple use on the mac-mini. Read speeds are about the same according to BlackMagic. Overall, Flutter app builds on the external drive are about 10% quicker.